How To Change Which Map Is Displayed On A Garmin GPS
Mon Jan 03, 2011 9:52 am
[SIZE="4"]How To Change Which Map Is Displayed On A Garmin GPS[/size]
With so many maps to choose from on this website and available from Garmin you're likely to have multiple maps loaded on your GPS receiver and you'll need to turn some on or off to show or hide different maps. This is most obvious when you have a topo showing and want to show City Navigator, or you have a topo showing and need to see another topo map.
This tutorial will walk you through how to show or hide maps on some of the most popular series of GPS units. Even if your unit isn't listed specifically it should be very similar to the steps listed for these series:
This section will detail how to change which maps are displayed on the Colorado, Oregon, and Dakota series GPS units. The process may vary slightly based on which profile you are using and which unit. The screenshots were taken with a Garmin Dakota 20.
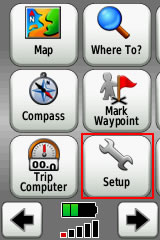
1. From the main menu screen find the setup button and click it:
2. Click "Map"

3. Click "Map Information Select Map"

4. Click on each individual map to enable (displayed) or disabled (hidden) the map
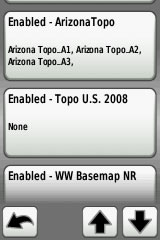
5. On the Dakota its as easy as clicking "Enable" or "Disable"; in this case I'm clicking disable (thus why its blue.
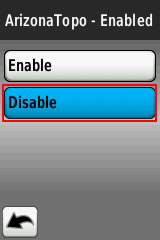
6. Repeat this for any maps until you have it configured how you would like. You've now shown/hidden maps on your GPS unit.
[SIZE="3"]Changing Maps Displayed on the GPSMap 60C(S)x, 76C(S)x, and eTrex Series[/size]
This section discusses how to change maps on the GPSMap 60CSx, 60Cx, 76CSx, 76Cx, eTrex and similar units. Showing/hiding maps in this case is not as easy as it is with the Colorado/Oregon/Dakota series. This screenshots were taken at night with a Garmin GPSMap 60CSx
1. Hit the "Page" key until you are viewing the map.
2. Press "Menu" and scoll to "Setup Map"
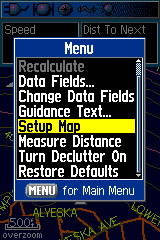
3. Press "Enter"
4. Scoll right/left until you get to the "I" (Map Setup - Information). From this page you can enable or disable single map segments; this is not reccomended.
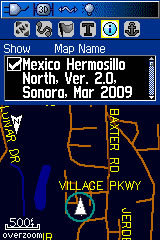
5. Press "Menu"
6. Here you can scoll to any option and hit enter. You can Show All or Show None from this screen. By pressing enter when it says "Hide [Map Name]" it will hide the map and the text will change to "Show [Map Name]".
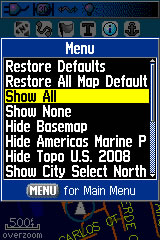
7. Show/hide maps from this screen until you've setup your map how you'd like. Then hit "Quit" twice to get back to the map.
[SIZE="3"]Changing Maps Displayed on the Nuvi Series[/size]
Although these maps are normally displayed on handheld units they can be installed on the Nuvi automobile and turned on and off. There are many different Nuvi units but these directions were tested on both a Nuvi 2x5 series and Nuvi 250W. The screenshots are from the updated 2x5 series Nuvi.
1. From the main menu screen press the "Tools" button

2. Press "Settings"
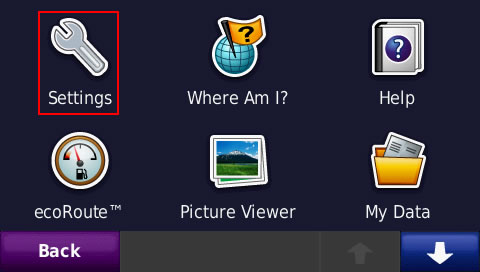
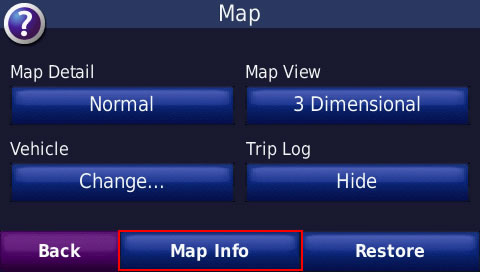
3. Scroll until you see "Map" and click it.
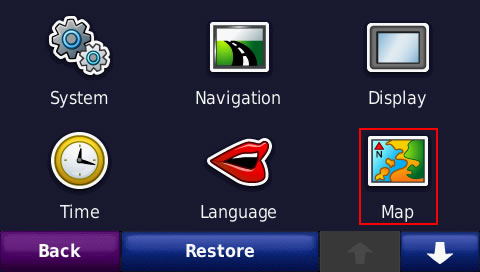
4. Click "Map Info"
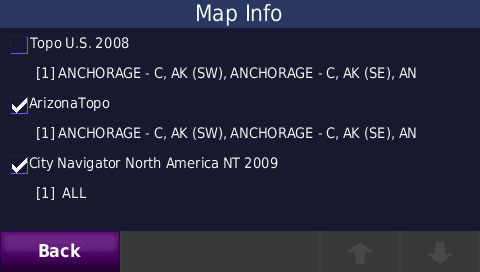
5. Check maps you want to display and uncheck those you would like to hide.
6. Hit back a few times and you'll be back at the menu; now you can view the maps configured as you would like.
[SIZE="3"]Conclusion[/size]
There are many other Garmin GPS units out there. If you're willing to provide directions and/or screenshots for how to turn maps on and off with your unit we'll be more than happy to add them here. Just post in the forums.
With so many maps to choose from on this website and available from Garmin you're likely to have multiple maps loaded on your GPS receiver and you'll need to turn some on or off to show or hide different maps. This is most obvious when you have a topo showing and want to show City Navigator, or you have a topo showing and need to see another topo map.
This tutorial will walk you through how to show or hide maps on some of the most popular series of GPS units. Even if your unit isn't listed specifically it should be very similar to the steps listed for these series:
- Garmin Colorado, Oregon, and Dakota series
- Garmin GPSMap 60Cx/60CSx, 76CX, 76CSx, and eTrex and similar series
- Garmin Nuvi series
This section will detail how to change which maps are displayed on the Colorado, Oregon, and Dakota series GPS units. The process may vary slightly based on which profile you are using and which unit. The screenshots were taken with a Garmin Dakota 20.
1. From the main menu screen find the setup button and click it:

2. Click "Map"

3. Click "Map Information Select Map"

4. Click on each individual map to enable (displayed) or disabled (hidden) the map

5. On the Dakota its as easy as clicking "Enable" or "Disable"; in this case I'm clicking disable (thus why its blue.

6. Repeat this for any maps until you have it configured how you would like. You've now shown/hidden maps on your GPS unit.
[SIZE="3"]Changing Maps Displayed on the GPSMap 60C(S)x, 76C(S)x, and eTrex Series[/size]
This section discusses how to change maps on the GPSMap 60CSx, 60Cx, 76CSx, 76Cx, eTrex and similar units. Showing/hiding maps in this case is not as easy as it is with the Colorado/Oregon/Dakota series. This screenshots were taken at night with a Garmin GPSMap 60CSx
1. Hit the "Page" key until you are viewing the map.
2. Press "Menu" and scoll to "Setup Map"

3. Press "Enter"
4. Scoll right/left until you get to the "I" (Map Setup - Information). From this page you can enable or disable single map segments; this is not reccomended.

5. Press "Menu"
6. Here you can scoll to any option and hit enter. You can Show All or Show None from this screen. By pressing enter when it says "Hide [Map Name]" it will hide the map and the text will change to "Show [Map Name]".

7. Show/hide maps from this screen until you've setup your map how you'd like. Then hit "Quit" twice to get back to the map.
[SIZE="3"]Changing Maps Displayed on the Nuvi Series[/size]
Although these maps are normally displayed on handheld units they can be installed on the Nuvi automobile and turned on and off. There are many different Nuvi units but these directions were tested on both a Nuvi 2x5 series and Nuvi 250W. The screenshots are from the updated 2x5 series Nuvi.
1. From the main menu screen press the "Tools" button

2. Press "Settings"

3. Scroll until you see "Map" and click it.

4. Click "Map Info"

5. Check maps you want to display and uncheck those you would like to hide.

6. Hit back a few times and you'll be back at the menu; now you can view the maps configured as you would like.
[SIZE="3"]Conclusion[/size]
There are many other Garmin GPS units out there. If you're willing to provide directions and/or screenshots for how to turn maps on and off with your unit we'll be more than happy to add them here. Just post in the forums.
Tue Sep 20, 2011 1:04 am
Hi, May i know does the nuvi map can be uses in GARMIN EDGE 705?
Tue Jan 03, 2012 1:54 am
I'm assuming these directions (late model Nuvi 2xxx) apply to additional maps stored in the MicroSD slot?
Tue Jan 03, 2012 8:47 am
It doesn't matter if the map is stored in internal memory or on SD card - in myMaps menu of nuvi 2xxx or 3xxx all usable maps are shown.
Re: How To Change Which Map Is Displayed On A Garmin GPS
Wed Nov 05, 2014 8:06 am
Can I use BlueChart_g2 Maps on a NUVI 3590? And if Yes - how do I add it (unlocked it bu get "can't unlock" error)...
Re: How To Change Which Map Is Displayed On A Garmin GPS
Thu Dec 11, 2014 9:23 am
I have a Nuvi 205 and followed the same procedure as above. I have loaded City Navigator Southern Africa (for in-town navigation) on the Nuvi and Tracks4Africa (for offroad travelling) on the SD card.
The Nuvi recognises both Maps but there is a problem. If I put the CN on the Nuvi and T4A on the SD (as currently), the Nuvi does not let me unselect CN, only T4A.
If I swap the 2 Maps around, it's the opposite (it will let me unselect CN, but not T4A). It's like you cannot unselect the one that is on the Nuvi itself.
How do I now know which map it is actually displaying when both are selected? Sure, I can unselect the one on the SD card and then I'm sure it is displaying the one on the device, but how the other way around?
I also can't put both maps onto the devise or SD card because the maps name MUST be GMAPSUPP.img (I tried renaming one to GMAPSUPP1.img - didn't work)
Also when I select both map sets in Mapsource and transfer them to the device/SD card, the Nuvi sees both maps separately but you cannot unselect either of the 2 and I don't know which one is actually displaying (it looks like it then prefers CN).
I just updated the firmware and it made no difference.
Please help if you can
Thanks